2020/05/20 12:42
[Wordpress]記事投稿画面でオリジナルショートコードが使えるエディタにカスタムする方法
WordPressの記事投稿する時にデフォのエディタを使ってると思いますが、これ実はカスタムできます。
ビジュアルエディタとテキストエディタがありますが、デフォだとビジュアルエディタの時点で太字にしたり大文字にしたり成形しながら文章を書きますね。
今回はこれをテキストエディタの方でショートコードを使った方法で自由にカスタムするやり方です。
ビジュアルエディタでの成形が不要な場合
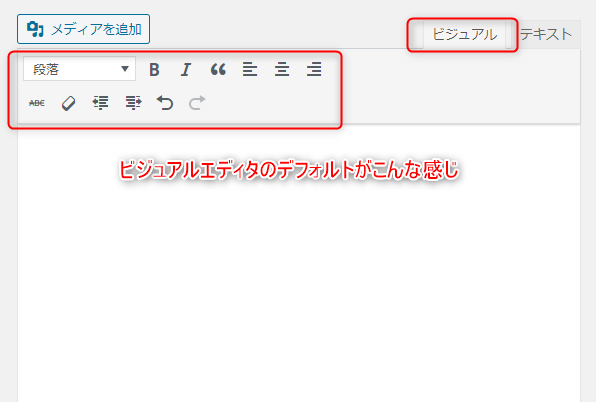
まず、ビジュアルエディタについてる

この辺りのボタンが不要だという場合は消す(非表示)事ができます。
下記コードをfunctions.phpへコピペ。
※注意
今回「functions.php」をいじる事が多いので、バックアップを取る等して、バグやエラーの対策はしておいた方が無難です。
【functions.php】
add_filter( 'mce_buttons', 'remove_mce_buttons' );
function remove_mce_buttons( $buttons ) {
  $remove = array(
    'formatselect', // フォーマット
    'bold',         // 太字
    'italic',       // イタリック
    'bullist',      // 番号なしリスト
    'numlist',      // 番号付きリスト
    'blockquote',   // 引用
    'alignleft',    // 左寄せ
    'aligncenter',  // 中央揃え
    'alignright',   // 右寄せ
    'link',         // リンクの挿入/編集
    'unlink',       // リンクの削除
    'wp_more',      // 「続きを読む」タグを挿入
    'wp_adv',       // ツールバー切り替え
    'dfw'           // 集中執筆モード
  );
  return array_diff( $buttons, $remove );
}

add_filter( 'mce_buttons_2', 'remove_mce_buttons_2' );
function remove_mce_buttons_2( $buttons ) {
  $remove = array(
    'strikethrough', // 打ち消し
    'hr',            // 横ライン
    'forecolor',     // テキスト色
    'pastetext',     // テキストとしてペースト
    'removeformat',  // 書式設定をクリア
    'charmap',       // 特殊文字
    'outdent',       // インデントを減らす
    'indent',        // インデントを増やす
    'undo',          // 取り消し
    'redo',          // やり直し
    'wp_help'        // キーボードショートカット
  );
  return array_diff( $buttons, $remove );
}
これでビジュアルエディタがスッキリしました。
次にテキストエディタでオリジナルのショートコードを作成しましょう。
さらにテキストエディタの方もスッキリさせる
デフォルトクイックタグというものがありまして、テキストエディタにもデフォでボタンがいろいろついてます。
これらも全部削除してスッキリさせましょう。
下記コードをfunctions.phpへコピペ。
【functions.php】
function remove_html_editor_buttons( $qt_init) {
  $remove = array('strong','em','b-quote','img','ul','ol','li','code','dfw','strong','link','del','block','ins','more'); //ここに非表示にしたいクイックタグのIDを記述
  $qt_init['buttons'] = implode(',', array_diff(explode(',', $qt_init['buttons']), $remove));
  return $qt_init;
}
add_filter( 'quicktags_settings', 'remove_html_editor_buttons' );
これでテキストエディタの方も余計なボタンがなくなってスッキリしました。
まっさらな状態でオリジナルショートコードを追加していく
さてテキストエディタの方へ自作のショートコードを作っていきます。
まずはコピペしてから、後は自由にカスタムしていけばいいかと思いますので下記コードをfunctions.phpへ。
・ショートコード用ボタンの実装例
【functions.php】
function custom_add_sc() {
if (wp_script_is('quicktags')){
?>
<script>
QTags.addButton( 'catch', 'キャッチ文', '
', '
');
QTags.addButton( 'subtitle', '見出し', '
', '
<br>');
QTags.addButton( 'headline', '小見出し', '
', '
');
QTags.addButton( 'benefits', '飾見出し', '
', '
<br>');
QTags.addButton( 'big', '大文字', '', '');
QTags.addButton( 'blue', '青', '', '');
QTags.addButton( 'red', '赤', '', '');
QTags.addButton( 'common', '引用文', '
', '');
QTags.addButton( 'lead', '文章', '
', '
');
QTags.addButton( 'attention', '注意書き', '
', '
<br>');
QTags.addButton( 'textlink', 'テキストリンク', '', '');
QTags.addButton( 'movie', '動画を囲む', '
', '');
QTags.addButton( 'space', '余白', '
');
</script>
<?php
}
}
add_action( 'admin_print_footer_scripts', 'custom_add_sc' );
記載のテンプレ構成としてはこんな感じです。
QTags.addButton( '【ID、分かりやすい名前】', '【表示用文言】', '[【開始用文言】]', '[/【終了用文言】]');
※IDの箇所はデフォルトクイックタグで削除したものとかぶらないようにしてください
さらにこちらもワンセットでfunctions.phpへ追記です。
function title_sc_code( $atts, $content = null ) {
  $content = do_shortcode( shortcode_unautop( $content ) );
  return '<h2 class="">' . $content . '</h2>';
}
add_shortcode( 'キャッチ文', 'title_sc_code' );

function subtitle_sc_code( $atts, $content = null ) {
  $content = do_shortcode( shortcode_unautop( $content ) );
  return '<h3 class="">' . $content . '</h3>';
}
add_shortcode( '見出し', 'subtitle_sc_code' );

function headline_sc_code( $atts, $content = null ) {
  $content = do_shortcode( shortcode_unautop( $content ) );
  return '<h3 class="">' . $content . '</h3>';
}
add_shortcode( '小見出し', 'headline_sc_code' );

function benefits_sc_code( $atts, $content = null ) {
  $content = do_shortcode( shortcode_unautop( $content ) );
  return '<h3 class="">' . $content . '</h3>';
}
add_shortcode( '飾見出し', 'benefits_sc_code' );

function big_sc_code( $atts, $content = null ) {
  $content = do_shortcode( shortcode_unautop( $content ) );
  return '<span class="">' . $content . '</span>';
}
add_shortcode( '大文字', 'big_sc_code' );

function blue_sc_code( $atts, $content = null ) {
  $content = do_shortcode( shortcode_unautop( $content ) );
  return '<span class="">' . $content . '</span>';
}
add_shortcode( '青', 'blue_sc_code' );

function red_sc_code( $atts, $content = null ) {
  $content = do_shortcode( shortcode_unautop( $content ) );
  return '<span class="">' . $content . '</span>';
}
add_shortcode( '赤', 'red_sc_code' );

function common_sc_code( $atts, $content = null ) {
  $content = do_shortcode( shortcode_unautop( $content ) );
  return '<div class="">' . $content . '</div>';
}
add_shortcode( '引用文', 'common_sc_code' );

function lead_sc_code( $atts, $content = null ) {
  $content = do_shortcode( shortcode_unautop( $content ) );
  return '<p class="">' . $content . '</p>';
}
add_shortcode( '文章', 'lead_sc_code' );

function attention_sc_code( $atts, $content = null ) {
  $content = do_shortcode( shortcode_unautop( $content ) );
  return '<p class="">' . $content . '</p>';
}
add_shortcode( '注意書き', 'attention_sc_code' );

function textlink_sc_code( $atts, $content = null ) {
  $content = do_shortcode( shortcode_unautop( $content ) );
  extract( shortcode_atts( array(
    'url' => '',
    'target' => '',
  ), $atts ) );
  return '<a href="'.$url.'" class="" target="'.$target.'">' .$content. '</a>';
}
add_shortcode( 'テキストリンク', 'textlink_sc_code' );

function movie_sc_code( $atts, $content = null ) {
  $content = do_shortcode( shortcode_unautop( $content ) );
  return '<div class="">' . $content . '</div>';
}
add_shortcode( '動画を囲む', 'movie_sc_code' );

function space_sc_code( $atts, $content = null ) {
  $content = do_shortcode( shortcode_unautop( $content ) );
  return '<div class="">' . $content . '</div>';
}
add_shortcode( '余白', 'space_sc_code' );
各「class」の箇所には自由にスタイルを当てるように成形してください。
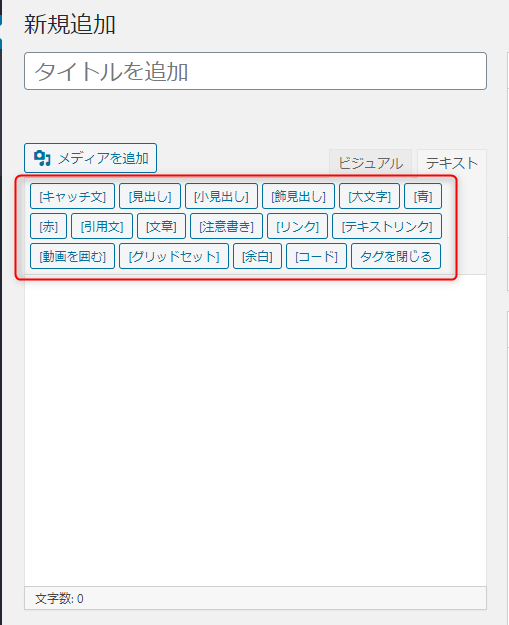
ここまでできたら恐らくこんな感じでテキストエディタが完成されてるはずです。

後は出力側の設定にも注意
ここまでできたら、今度は記事の個別ページ等に出力される文章自体の設定も見直しておきましょう。
記事の内容の部分の出力には
<?php the_content;?>
これを使うと思うのですが、特にカスタムフィールド等と絡めてショートコードを使う場合は下記のように出力するのをオススメします。
【single.php等】
<?php echo apply_filters('the_content', get_post_meta($post->ID, the_content(), true)); ?>
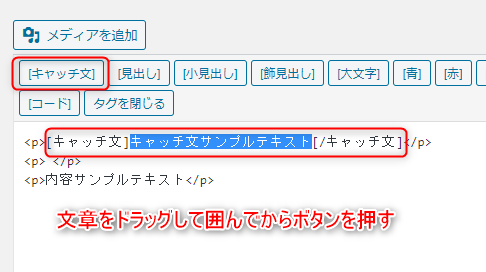
後は文章を書いた後にドラッグして文章を囲んで、指定のボタンを押す事によって…

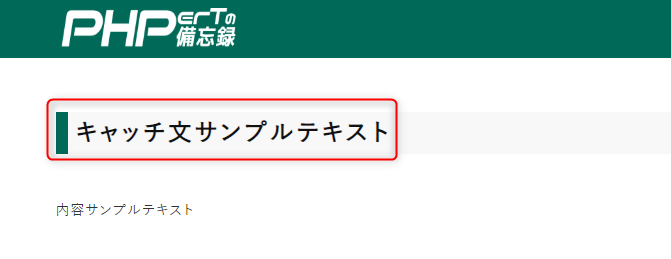
ちゃんと指定したスタイルが当たってます。

よく使うスタイルの文章の形というものがある程度確立されている場合は、この自作のショートコードを使った記事の書き方は楽になると思います。
では現場から以上です!
1517

